Guide to playing in Highland effectively
About Highland
Overview: Highland is a smaller map at 8v8, and has been around since the game’s creation, being a favorite for tankers of any rank. It is a very technical map, demanding teamwork or frequent death and defeat will be the consequences. Unlike many larger maps, Highland is not symmetrical, and playstyle changes will be needed when switching teams. This map, more than any other, will truly test a tanker’s capabilities.
Battle Modes: DM, TDM, CTF, CP
Size: 16 players, 8 vs 8
Tactics
DM
Like other smaller maps, in Highland, it is impractical to use a light hull; medium and heavy hulls are highly preferred. Damage per second is a high priority, thus the medium or heavy hull should be paired with a short or mid-ranged turret. Attention should also be paid to Modules, as they are often critical for survival. Modules more situated for short and mid-range combat, such as those, of the Shark and Lion series, are optimal.
The choice of equipment is not the only factor; the tanker’s playstyle may be equally important. Players who use the map to their advantage score many more kills than those who neglect to do so. For example, tankers that smartly use props to peek in and out of cover, taking shots at enemies with their mid-ranged turret, generally do better than tankers that simply charge at their opponents.
A couple of the most effective combinations for Highland DM are Twins-Titan/Mammoth and Thunder-Titan/Mammoth. Twins can spew and endless array of high impact plasma blasts that can knock off a player’s aim. As a heavy hull, players would be much more inclined to fire from afar, thus partially removing the issue of self-damage, although range is short. A Thunder-Titan/Mammoth can usually hold its own against multiple attacking players and reach a further distance with its shots. Also, using its splash damage, the Thunder can often obtain multiple kills with one shot.
DM Pro Tip
This may refute the idea that long-ranged weapons are ineffective in this map for DM. Camping behind the small house where the blue flag would be in CTF, is a good spot as you can line up tankers down the road and score several kills at once.
TDM
Although TDM is the least popular choice of the four game modes, it too needs an optimized strategy. As there are no flags or capture points, the only objective is to either be the first team to reach a certain number of kills or to be the team with the the most tanks destroyed before the clock ends.
Unlike DM, Highland TDM allows you a greater choice of effective equipment, due to the fact that you aren’t on your own. Since it is so diverse in tanks, this battle is a great place to experiment with new combinations.
Firebird-Viking is a good choice, because you can get around reasonably quick while also having a significant amount of hit points, and the afterburn effect will often destroy your opponent even if you’ve been destroyed first. As with any other team battle, Highland TDM is a great place to use Isida to keep your teammates alive, especially those with heavier hulls. A Magnum-Titan/Mammoth hidden in a team’s base can more than take on the challenge of weakening the enemy’s offenses due to its indirect fire capabilities and vast amount of health.
TDM Pro Tip
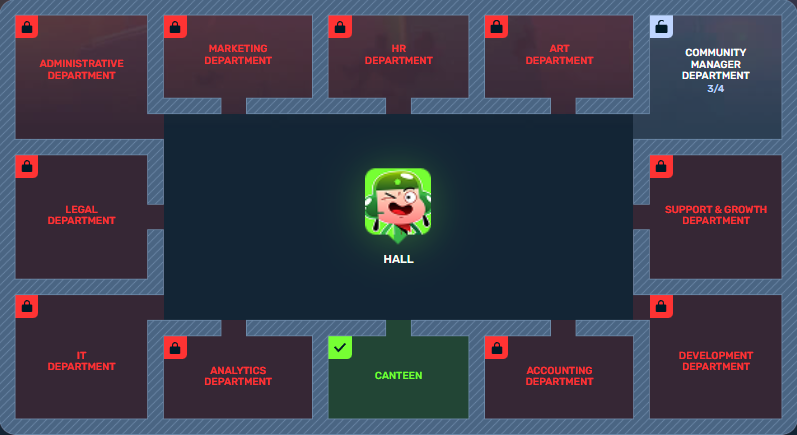
This is an image of the recommended setup for both teams in TDM:
Here are spots where supportive/defense tanks should be positioned, where the purple spots are snipers, with either Shaft, Railgun or Magnum, to deliver heavy blows to oncoming enemies. The green represents where strong defensive tanks should be, with either medium or heavy hulls. They should be equipped with either Smoky, Thunder or Striker to support the attackers. Finally, the red spots show where Isidas should be located.
CTF
In Tanki Online, CTF is definitely one of the more involving modes, as your team not only needs to destroy enemies, but also manage to take the flag from the generally heavily guarded enemy base and bring it all the way across the map back to yours. Highland CTF is no exception, requiring an excellent team with impeccable strategy to capture in, perhaps even more so than the average map. While in most other maps the flag is in an open area with many routes to and from it, in Highland, the flag is surrounded by buildings and walls, with only one or two ways to escape. When coupled with the fact that a large number of tankers are usually defending them, Highland’s flags take fantastic teamwork to capture.
In a relay race, one person runs the baton to another until the finish line is reached. Highland CTF is much the same, with players first retrieving the baton from the enemy. With slim chances of surviving the full trip back regardless of the hull, it is highly recommended when wounded to pass the flag to another teammate and cover their escape.
For Highland CTF, Smoky-Viking/Dictator/Titan, Isida-Wasp/Hornet and Freeze-Wasp/Hornet are good choices, more specifically as a team to take enemy flag. The Smoky a medium to heavy hull to be fast enough to reach the middle of the map while armored enough to be the muscle of the team and fight off defending enemies. With light hulls, the Freeze and Hornet would be suited to quickly getting in and out of the enemy base, and the Freeze could slow any pursuing enemies to a near stand-still, preventing them from giving further chase. The Isida would be a good support to keep the other two tanks in the team healed.
CTF Pro Tip
Here is a map of reference for suggested routes for Blue team:
So, there are two routes, the black line being the first and the red line being the second. It should be noted that you follow the black route to the flag and continue back, or take the red route back to the flag. If needed and if it’s there, take the repair kit, then follow the red route. The White dot is the starting point, while the blue dot is the ending point.
The black route is more optimized for a shorter route, with a quick way in and a quick way out. Thus, a light hull is preferred for this route. The red route, on the other hand, takes a bit longer, however, if the repair kit is there, feel free to take it if needed.
Suggested routes for Red team:
Once again, the black line is the first route and red is the second, the white dot being the start point and the blue dot being the end point. Although, with the red route in this one, you can take it to and from the enemy flag.
The black route, in this case, is designed to gather supply boxes, along a route, meant for keeping cover until you reach the enemy flag. The red route is meant for a quick in and out attack, utilizing the repair kit drop.
CP
CP mode consists of one or more points in the map which both teams must fight over control for. In Highlands, there are three control points. One point is located in the dead center of the map, one to the left of Red base and the third and final point, to the left of Blue base. Keep in mind the middle point will be fought for the most, with a repair kit nearby. Control over this point will either be dominated over, or constantly changing.
The control point closest to blue base provides cover, being behind a building, so control over this one should be vital. In contrast, the point to the south lacks any chance of cover, so you will be subject to fire from enemy tanks. With the center point rapidly changing, there is no real benefit from it, so attention should be more paid towards the north and south points.
It should be noted that Titan or Mammoth are best fit for this map in this mode, since you will need to be able to take over and take control of the points, while defending from enemy fire. Isidas are also important to keep yourselves healed. If you’re low on health, defending a point will be a challenging feat.
CP Pro Tip
When playing CP, it is a good idea to have a Magnum or two firing towards the center of the map, before making a frontal assault. This means your team can go in and easily dispose of the enemy tanks positioned there. Domination over this point can makes all the difference in Highland.
Conclusion
Highland is not an easy map to play on, and should be approached with caution. Although, if you’re looking to heighten your skill, this is the map to do it on. In any mode, you will be challenged, more so than many of the other maps Tanki Online has to offer. If you’re going to play on this map you better bring your best.
Recommended Equipment
DM/TDM
Firebird, Freeze, Isida, Hammer, Twins, Ricochet, Smoky, Thunder, or Striker
Hunter, Viking, Dictator, Titan, or Mammoth
CTF
Firebird, Freeze, Isida, Hammer, Twins, Ricochet, Smoky, Thunder, or Striker
Wasp, Hornet, Viking, Dictator, Titan, or Mammoth
CP
Firebird, Freeze, Isida, Hammer, Twins, Smoky, Thunder
Dictator, Titan, or Mammoth
 Jump to content